Peek Box for Creation
Genesis 1
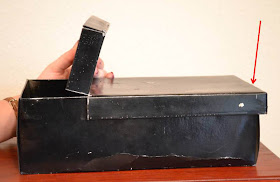
This box is a fun way to teach about creation. I like to show the children the box with the lid closed like the first picture. I build anticipation by asking them what is in the box and then looking inside and getting excited. I tell them that inside the box there is a picture of something that God made. When the children look at it, they look into the hole at the end of the box marked by a red arrow in the second picture. I open the small section of the box lid to let light in and they are thrilled to see the picture of the family or animal or plant or whatever the picture is. I change the picture and do it again. The children get very excited about what is in the box each time!
Materials:
- Shoebox with removable lid
- Black spray paint
- Pictures from computer
- Clear plastic of some kind or page protector
- Tape or hot glue
- Scissors (and possibly an exact-o knife)
Instructions:
- Spray paint the shoebox and lid black inside and out.
- Tape or glue a clear pocket on the inside of one end of the box to keep the picture in place. :eave the top of the pocket open to insert pictures. (I use leftover lamination or a page protector.)
- On the opposite end of the shoebox, cut a rectangle to be a peek hole (like the top picture). I used an exact-o knife.
- Print out a variety of really cute pictures (animals, plants, people, sun, moon, stars, clouds, etc.) small enough to fit inside the pocket in the shoebox. Laminate if desired.
- Cut a slit in both sides of the shoebox lid about 3 inches from the end. Fold the lid up like in the middle picture.
- Put one of the computer pictures in the pocket inside the shoebox.
- Peek inside.


No comments:
Post a Comment